As of now, Engyj continues to grow in popularity and has successfully served a growing number of satisfied customers.
# Chat Now When the admin logs in, they will be directed to the dashboard by default, and there will be a **'Chat Now'** button in the right corner. Using this link admin can easily Start chatting with the visitors of their website. [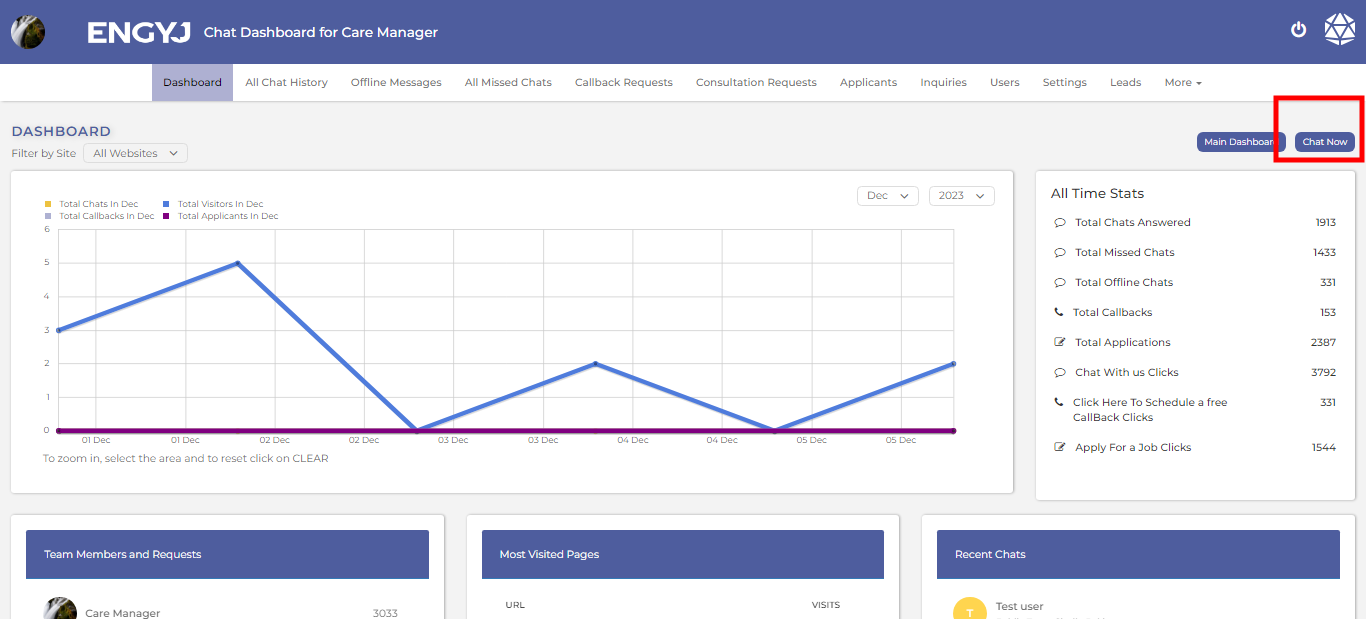](https://documentation.engyj.com/uploads/images/gallery/2023-12/chat-now.png) Clicking on that button will redirect you to the **Chat Now** page. Here you can view different stats from the highlighted area. [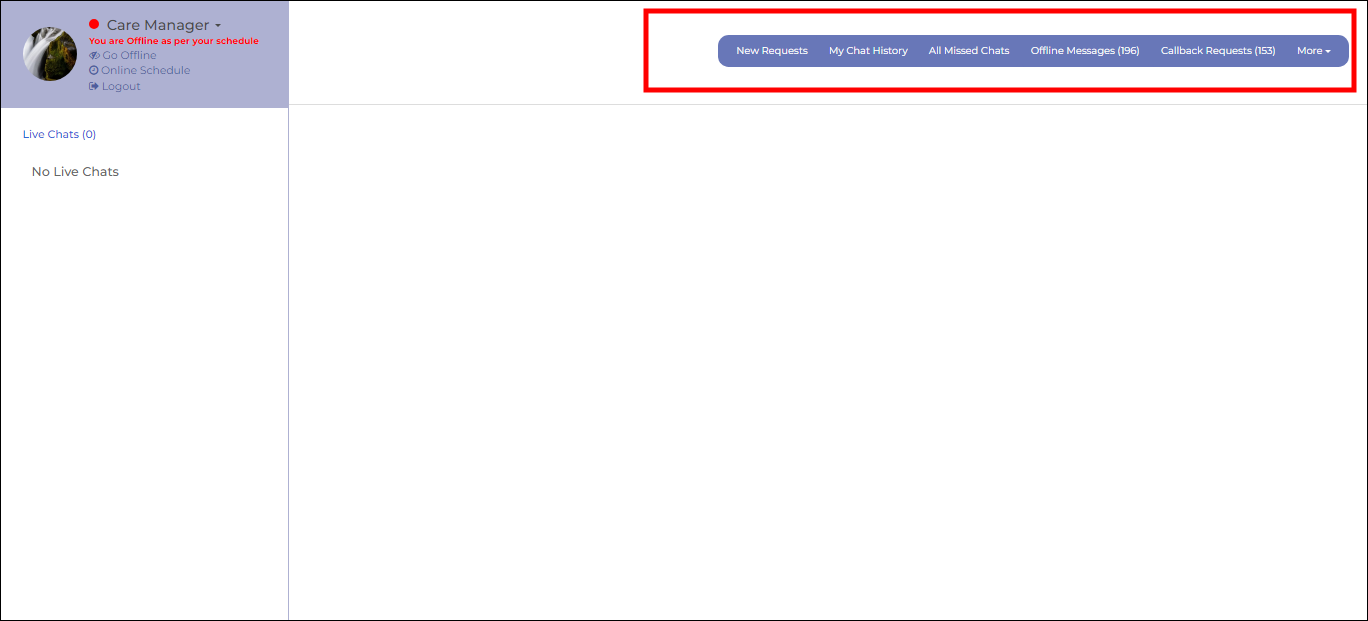](https://documentation.engyj.com/uploads/images/gallery/2023-12/chat-now-options-border.png) # Visitor On a Webpage If a visitor visit on the webpage, Admin can see the visitor on his live chat panel below the live chat in the left column, there will be a section titled "Live Website Visitors," where the current visitors will be displayed. [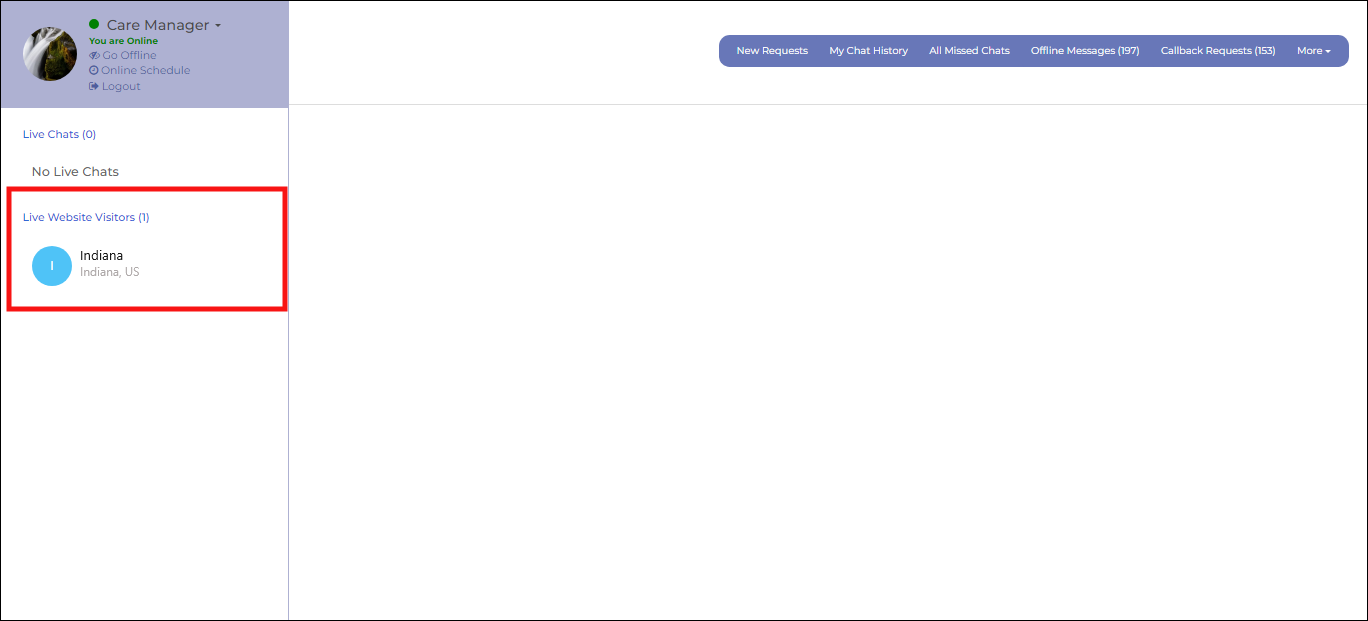](https://documentation.engyj.com/uploads/images/gallery/2023-12/CPKvisitor-on-the-landing-page-border.png) # Invite Visitor Certainly! The admin has the ability to invite the visitor who is on the webpage for a chat. Admin can simply click on the user's name, and then the chat section will open in the center with the visitor's details on the right side. The admin can send a message to invite the visitor for a chat. [](https://documentation.engyj.com/uploads/images/gallery/2023-12/invite-visitor-border.png) # Visitor Accept Invite The visitor can accept the admin's invite on the webpage, and the admin's invitation message will be displayed. If the visitor wishes to chat with the admin, they can click on the "Start Chat" button to initiate the conversation. [](https://documentation.engyj.com/uploads/images/gallery/2023-12/visitor-accept-invite-border.png) # Visitor Request Admin For The Chat If a visitor is on the webpage and wants to contact the admin, he can click on the "Chat with Care Manager" button. It will send a chat request to the admin. If the admin is online and accepts the request, the live chat will start.  # Admin Accept Visitor's Request When the admin receives an invitation to chat with the visitor, two options will appear. First, a request message alert will appear at the bottom right [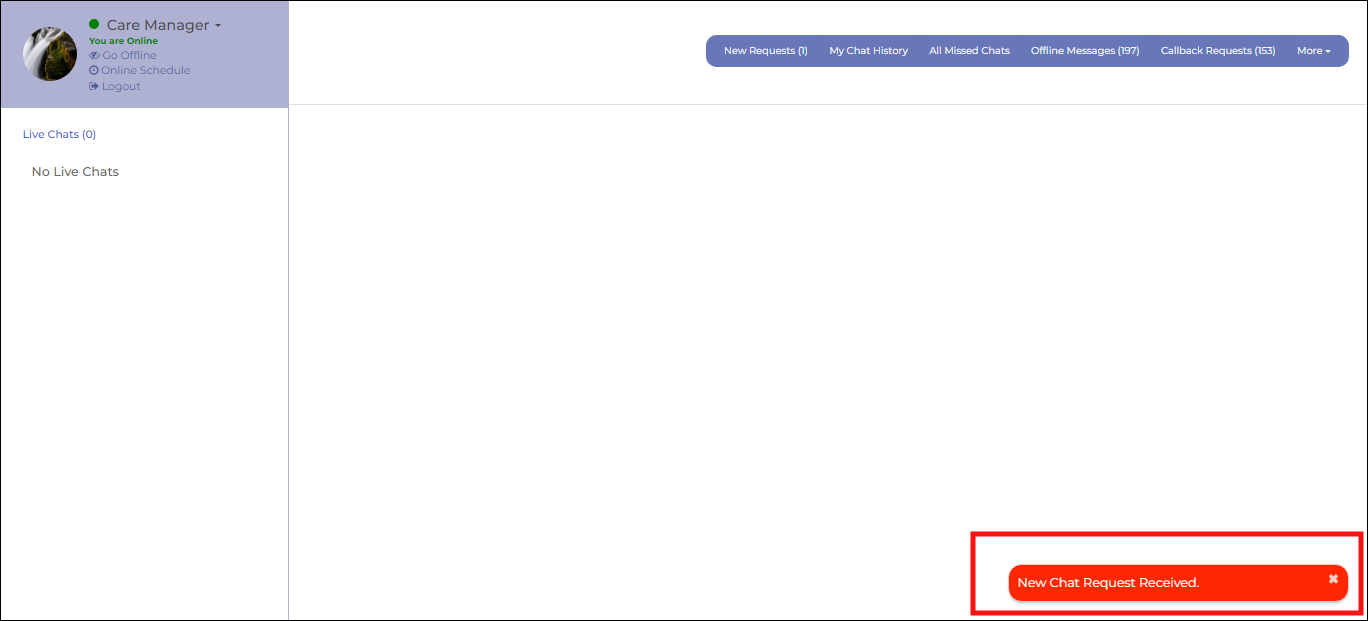](https://documentation.engyj.com/uploads/images/gallery/2023-12/admin-accept-live-chat-border.png) Clicking on it will prompt an alert box with two buttons: one to accept and the other to decline the live chat. [](https://documentation.engyj.com/uploads/images/gallery/2023-12/admin-accept-live-chat-2-border.png) # Live Chat When both the user and the applicant are online, if one of them sends a request and the other accepts it, the live chat will begin, and they can communicate each other. [](https://documentation.engyj.com/uploads/images/gallery/2023-12/live-chat-border.png) From this point, the admin has the ability to assign the visitor a status, add internal notes, and forward the chat. Both the admin and the visitor have the option to close the chat. # All Chat History # Chat History List In the **"All Chat History"** section, all the chat conversations that have occurred between the admin and the visitor will be displayed along with some details. To view chat history, go to the **All Chat History** menu item. Here, you will find a record of all chats. [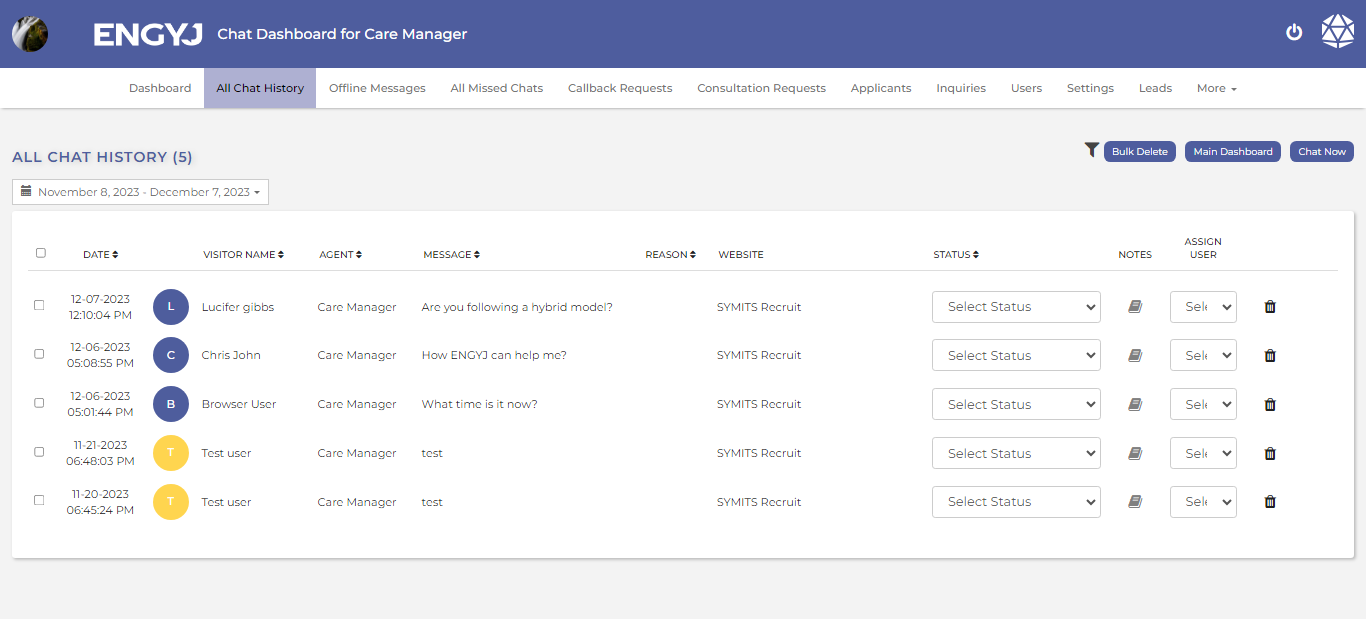](https://documentation.engyj.com/uploads/images/gallery/2023-12/Uqnall-chat-history.png) # View Chat To view chat history, go to the **All Chat History** menu item. From here, you can also view the chat. Just click on the chat you want to see. The dialogue box for the chat will open up. [](https://documentation.engyj.com/uploads/images/gallery/2023-12/view-chat.png) # Select Status And Assign User You can select the dropdown option available here to change the status and assign a user [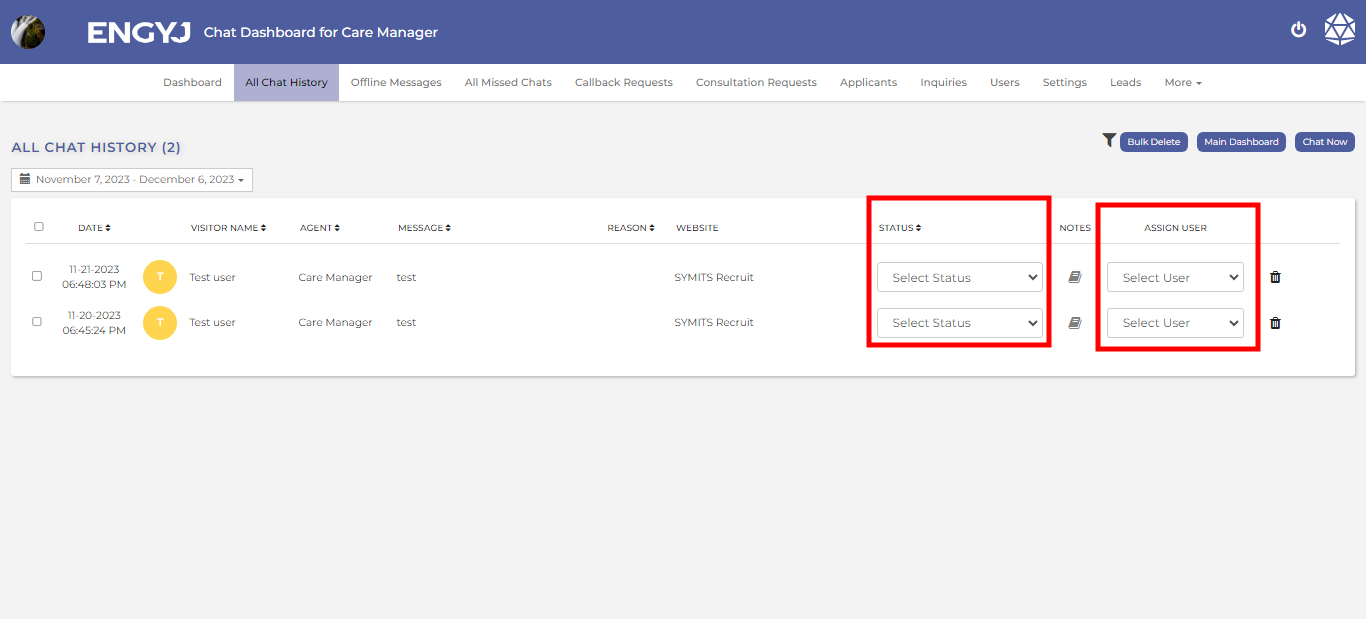](https://documentation.engyj.com/uploads/images/gallery/2023-12/EY9statusassign-user.png) # Internal Note Here, the admin can also add an internal note by clicking on the book icon. The chat that has an internal note attached will have its book icon displayed in green. [](https://documentation.engyj.com/uploads/images/gallery/2023-12/internal-note.png) # Delete Chat To delete chat history, go to the **All Chat History** menu item. You can delete a chat by clicking on the delete icon in the right column. [](https://documentation.engyj.com/uploads/images/gallery/2023-12/delete-chat.png) This will open a confirmation popup box with YES and No options to confirm before deleting a Chat. If chosen **YES**, then the Chat will be deleted from list. # Offline Messages # Offline Messages List If the admin is offline and a visitor sends a message, the message will be saved in the **"Offline Messages"** section for the admin to check later. To view Offline Messages, go to the **Offline Messages** menu item. Here, you will find a record of all offline messages. [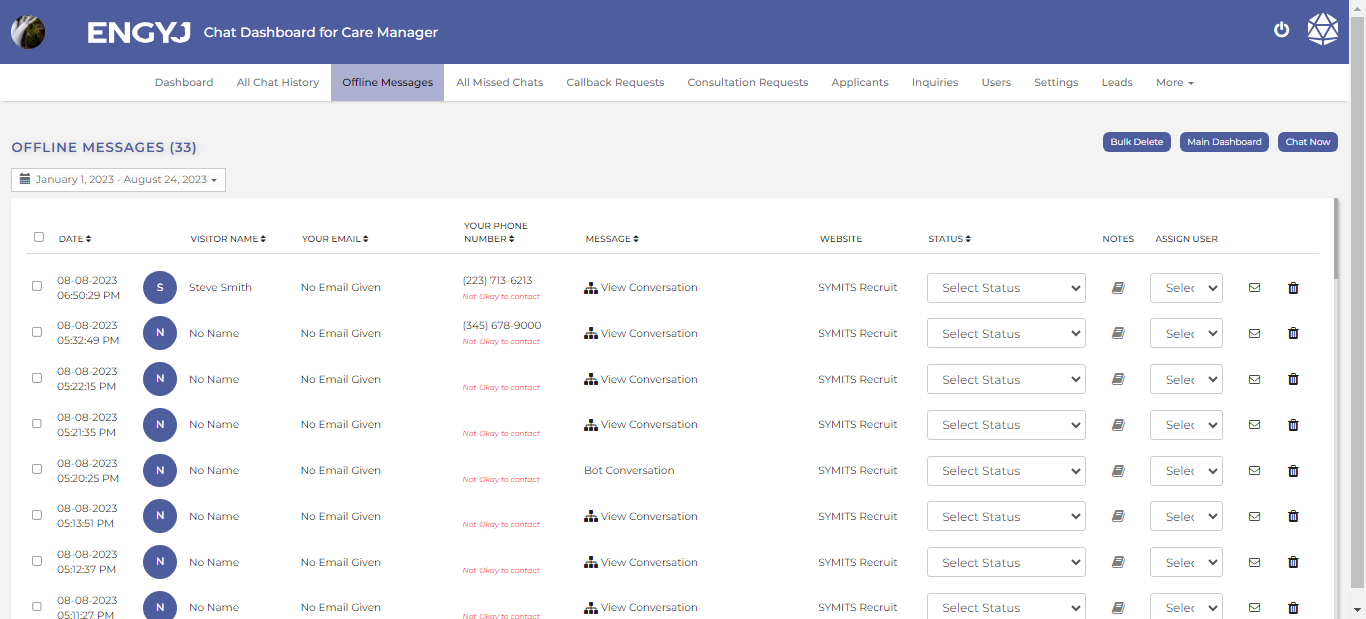](https://documentation.engyj.com/uploads/images/gallery/2023-12/offline-msg.png) # View Offline Messages To view Offline Messages, go to the **Offline Messages** menu item. From here, you can also view the chat. Simply click on "View Conversation" in the message column. [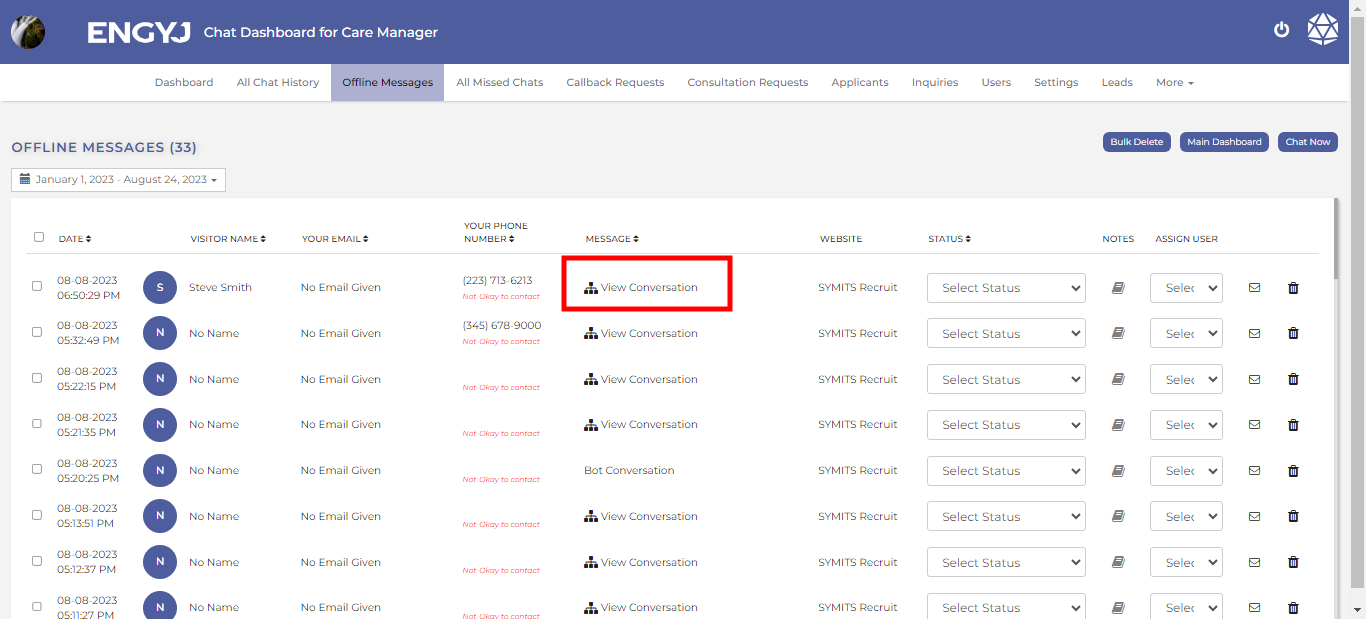](https://documentation.engyj.com/uploads/images/gallery/2023-12/offline-msg-messages.png) The dialogue box for the chat will open up. [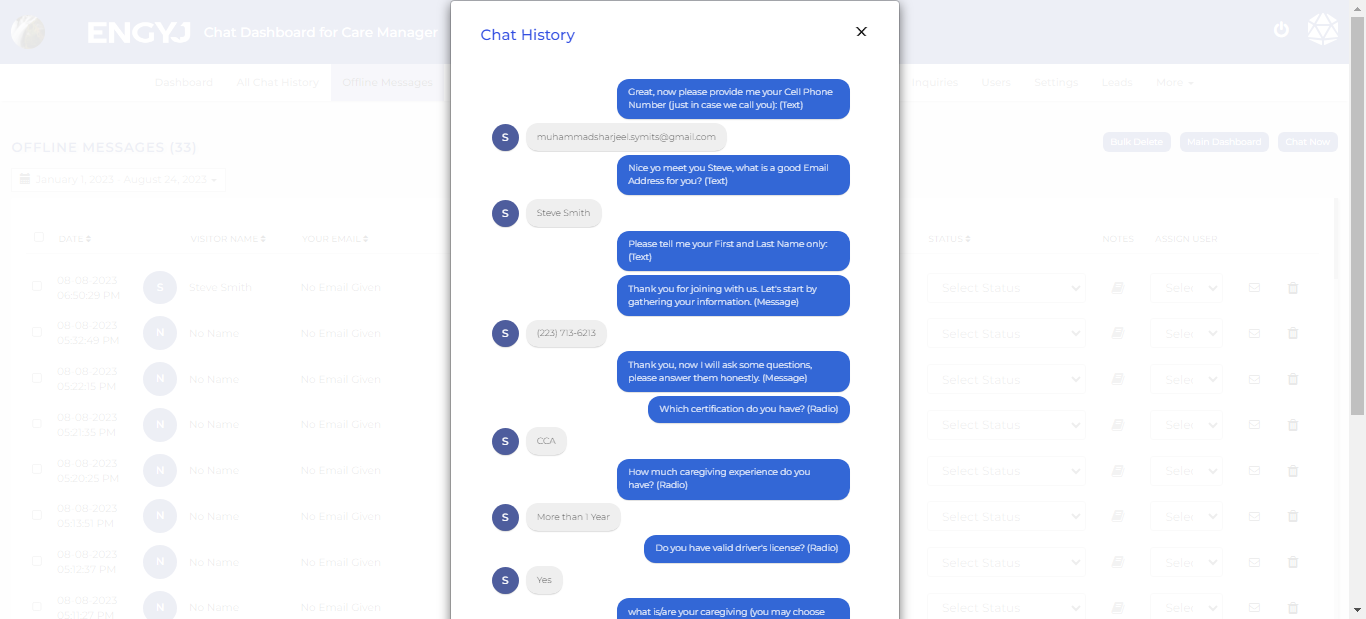](https://documentation.engyj.com/uploads/images/gallery/2023-12/view-conversation.png) # Select Status And Assign User Go to the **Offline Messages** menu item. From here you can select the dropdown option available here to change status and assign user. [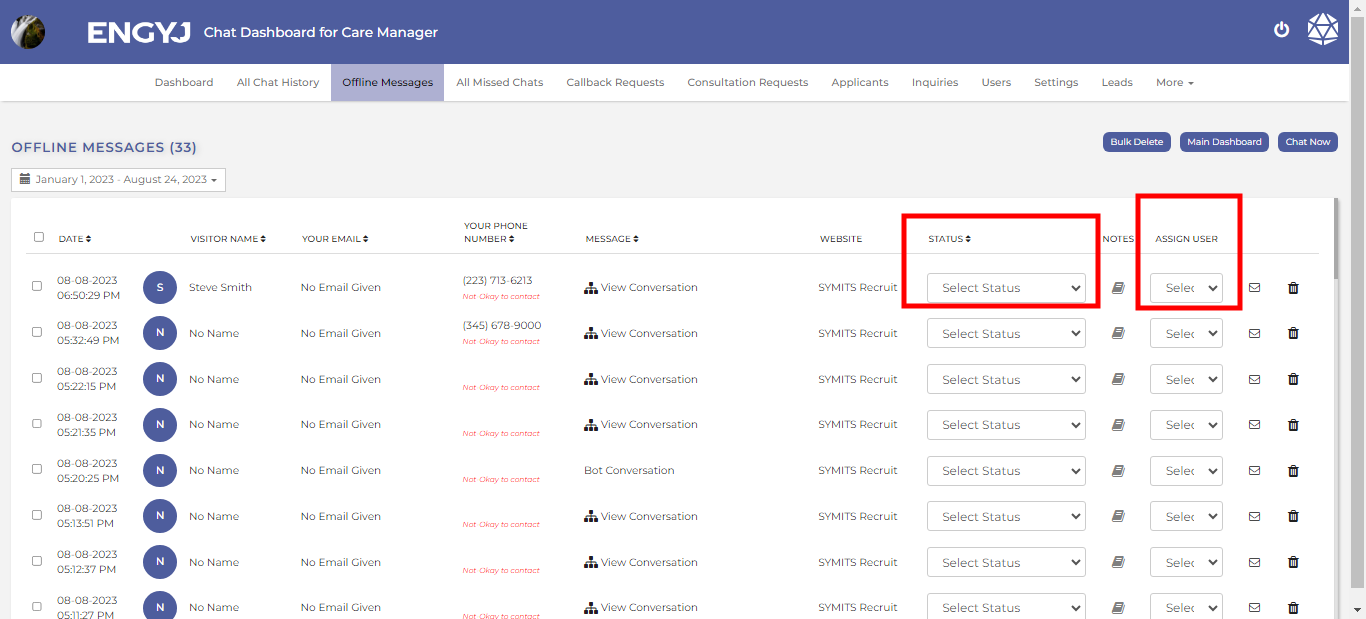](https://documentation.engyj.com/uploads/images/gallery/2023-12/offline-msg-status-assign-user.png) # Internal Note To add internal note to Offline Messages, go to the **Offline Messages** menu item. Here, the admin can also add an internal note by clicking on the book icon. The chat that has an internal note attached will have its book icon displayed in green. [](https://documentation.engyj.com/uploads/images/gallery/2023-12/offline-ms-internal-note.png) # Mail To send mail, go to the **Offline Messages** menu item. Here admin can send mail to the customer by clicking on the mail icon. [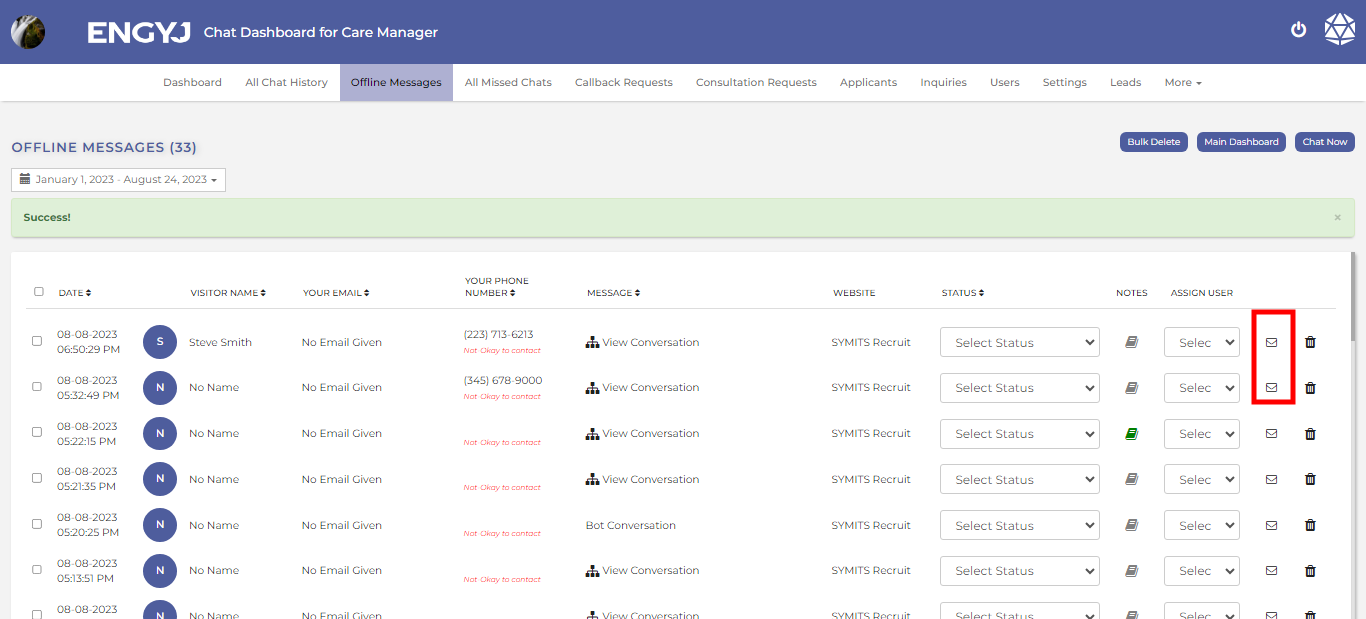](https://documentation.engyj.com/uploads/images/gallery/2023-12/mail-offline-msg.png) After clicking on it, It will redirect you to mails. # Delete Offline Messages To delete Offline Messages, go to the **Offline Messages** menu item. You can delete a chat by clicking on the delete icon in the right column. [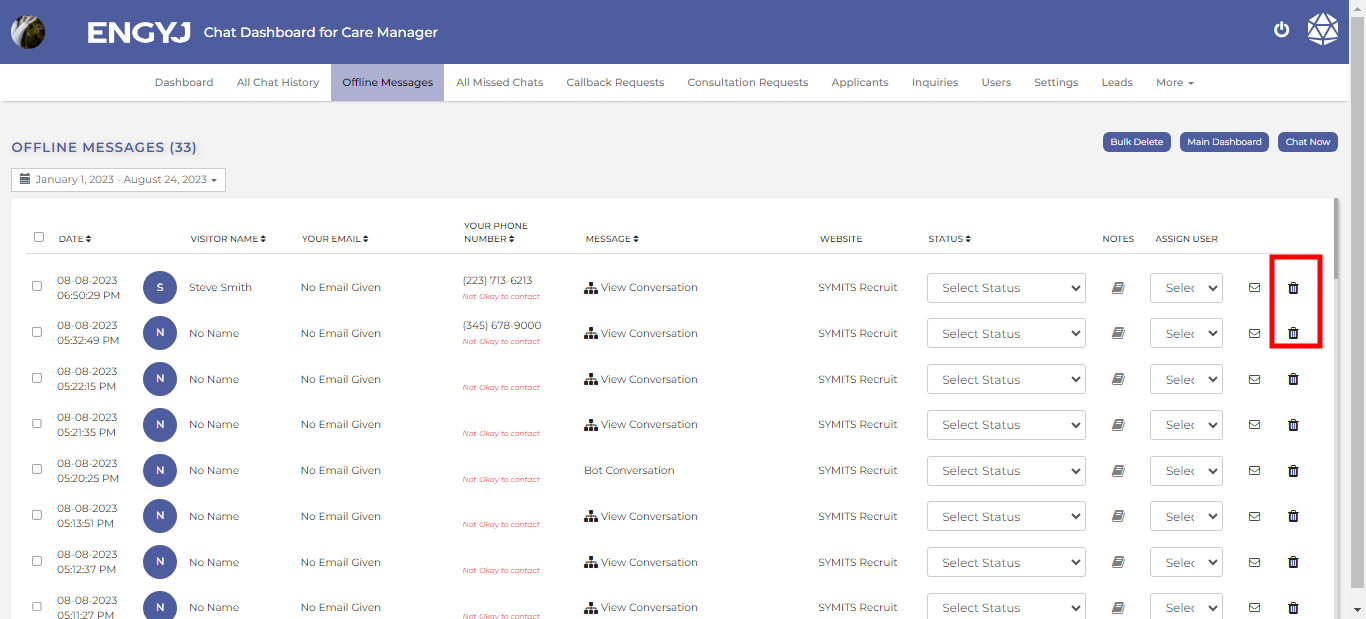](https://documentation.engyj.com/uploads/images/gallery/2023-12/delete-offline-msg.png) This will open a confirmation popup box with YES and No options to confirm before deleting a Chat. If chosen **YES**, then the Chat will be deleted from list. # Missed Chat # Missed Chat If, for any reason, the admin is unable to read a chat, the chat will be saved in the "All Missed Chat" section for later review. To view Missed Chats, go to the **All Missed Chat** menu item. Here, you will find a record of all missed chats. [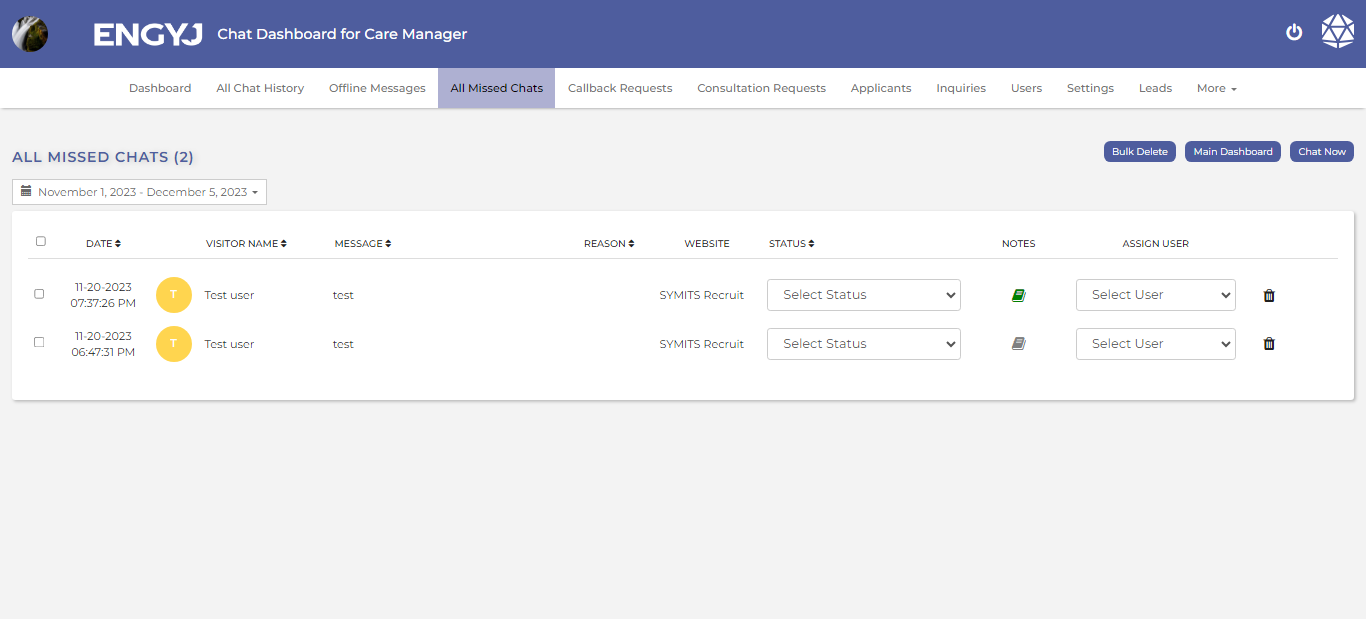](https://documentation.engyj.com/uploads/images/gallery/2023-12/missed-chat.png) # View Missed Chat To view chats, go to the **All Missed Chat** menu item. From here, you can also view the chat. Just click on the chat you want to see. The dialogue box for the chat will open up. [](https://documentation.engyj.com/uploads/images/gallery/2023-12/view-missed-chat.png) # Select Status And Assign User Go to the **All Missed Chat** menu item. You can select the dropdown option available here to change status and assign user. [](https://documentation.engyj.com/uploads/images/gallery/2023-12/aBcstatus-assign-user.png) # Internal Note To add internal note to Missed Chats, go to the **All Missed Chat** menu item. Here, the admin can also add an internal note by clicking on the book icon. The chat that has an internal note attached will have its book icon displayed in green. [](https://documentation.engyj.com/uploads/images/gallery/2023-12/missed-chat-internal-note.png) # Delete Missed Chat To delete Missed Chats, go to the **All Missed Chat** menu item. You can delete a chat by clicking on the delete icon in the right column. [](https://documentation.engyj.com/uploads/images/gallery/2023-12/ZnXdelete-missed-chat.png) # Callback Request # Callback Request If a visitor wants the admin to contact them at a specific time, they can click on the **"Call Back Request"** button shown on the webpage. After clicking, the visitor will fill in their credentials and submit the request. This request will then be saved in the **"Call Back Request**" section. To manage callback request, go to **Callback Request menu item. Here, you will see a record of all callback request messages. [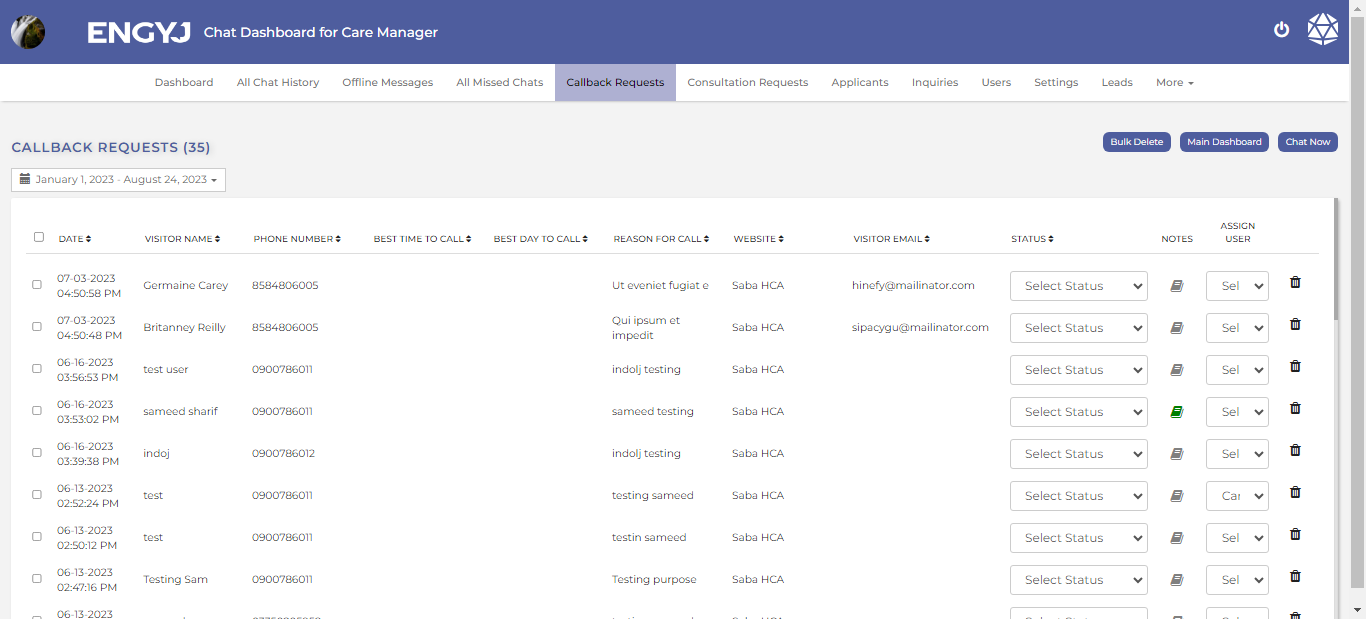](https://documentation.engyj.com/uploads/images/gallery/2023-12/callback-request.png) # Select Status And Assign User To manage callback request, go to **Callback Request** menu item. You can select the dropdown option available here to change status and assign user. [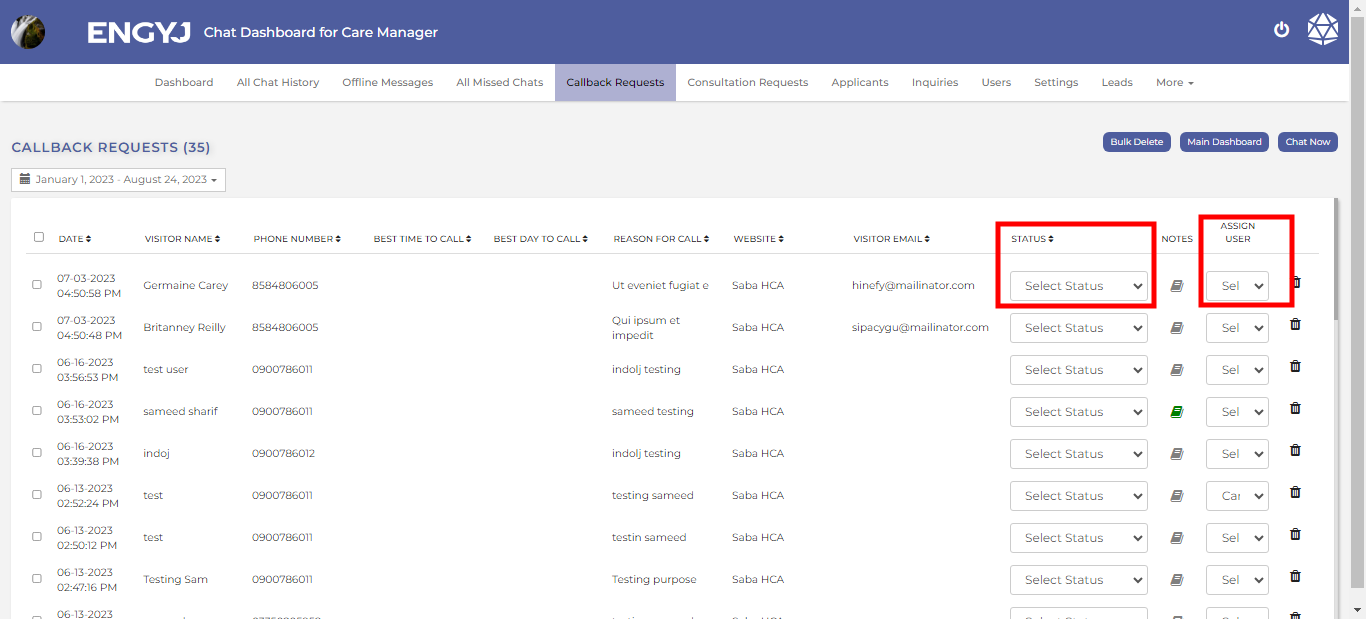](https://documentation.engyj.com/uploads/images/gallery/2023-12/callback-select-status-assignuser.png) # Internal Note To manage callback request, go to **Callback Request** menu item. Here, the admin can also add an internal note by clicking on the book icon. The chat that has an internal note attached will have its book icon displayed in green. [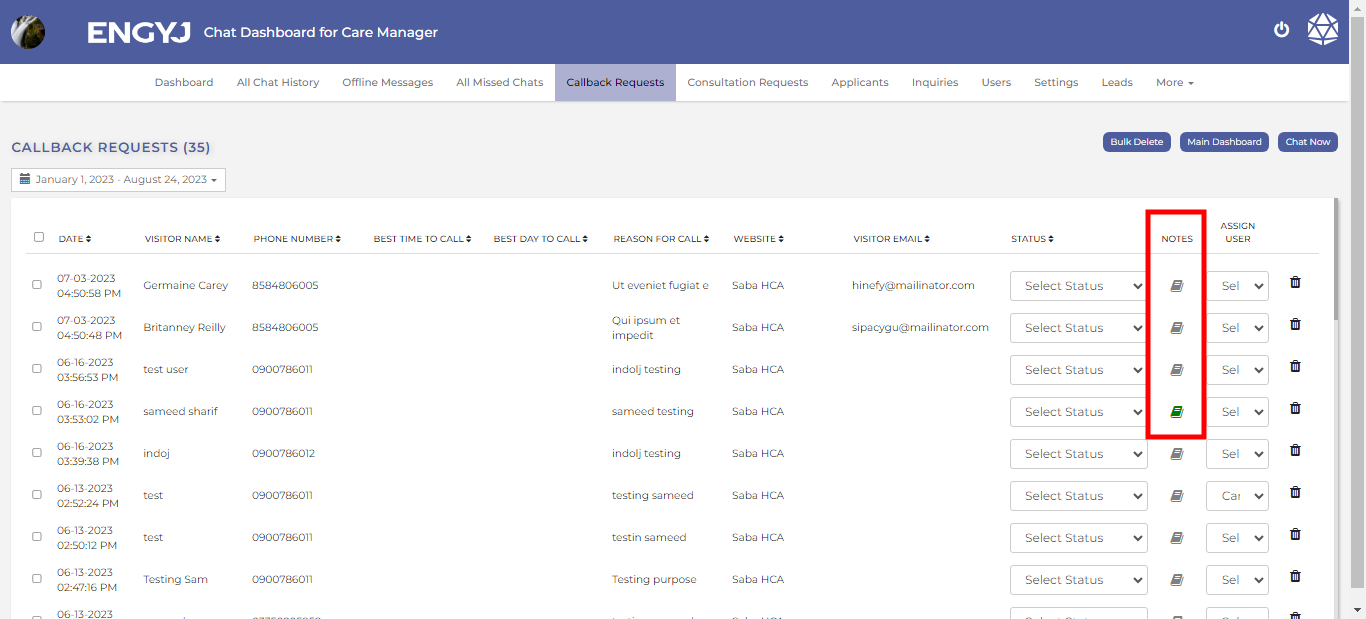](https://documentation.engyj.com/uploads/images/gallery/2023-12/callback-internal-note.png) # Delete Callback Request To delete callback request, go to **Callback Request** menu item. You can delete a chat by clicking on the delete icon in the right column. [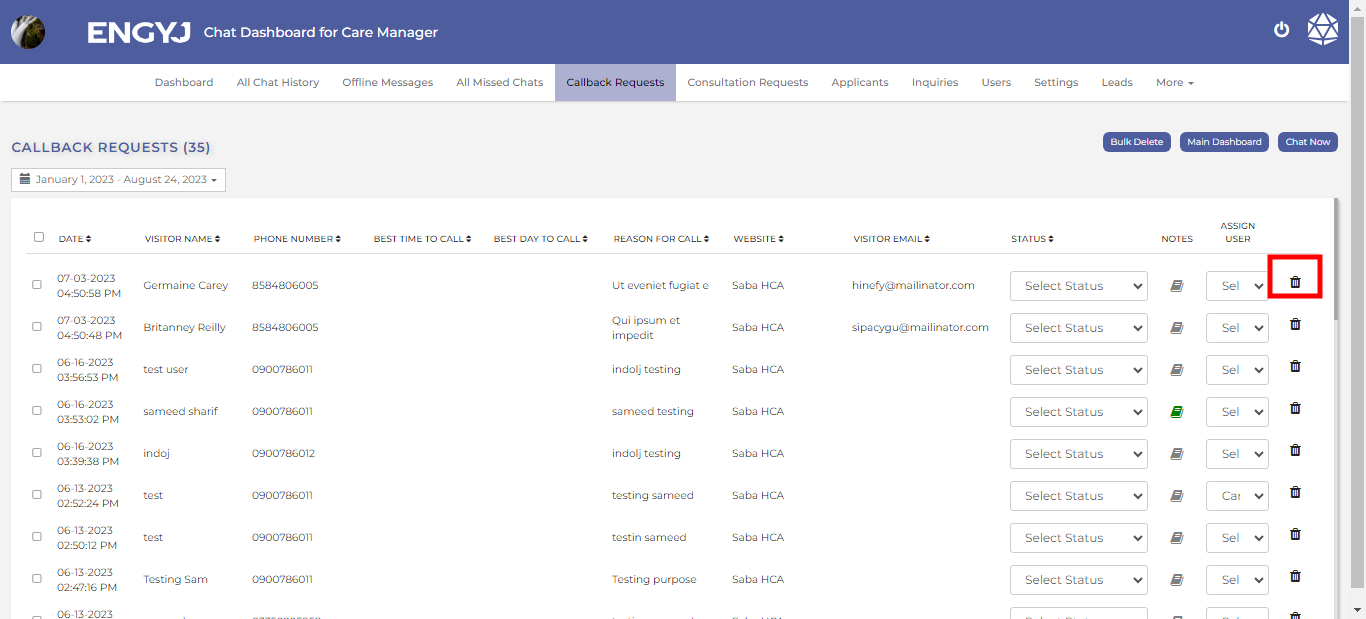](https://documentation.engyj.com/uploads/images/gallery/2023-12/callback-delete.png) # Users # Users To manage users, go to **Users** menu item. Here you can see a record of all the created Users along with their role and status. [](https://documentation.engyj.com/uploads/images/gallery/2023-12/NV3users.png) # Add User To create a new User, go to **Users** menu item. There are two options to create a user 1. click the **+** button given in bottom right corner of the screen as shown in following figure. 2. Click on the add button on the top right corner beside "chat Now and Main dashboard" button [](https://documentation.engyj.com/uploads/images/gallery/2023-12/add-user.png) This will open a dialogue box where you can enter the required credentials and then click the submit button. # Modify User To manage Users, go to **Users** menu item. To modify a user, click the pencil icon under ACTION column of the specific row in the list of the users. or Just click directly on the user, and you can edit it right away. [](https://documentation.engyj.com/uploads/images/gallery/2023-12/kfOmodify-user.png) This will open a dialogue box where you can change the credentials # Settings # Site Settings To manage settings, go to **Settings** menu item. From here you can go to your desire site and change the site setting by click on setting icon. [](https://documentation.engyj.com/uploads/images/gallery/2023-12/settings.png) It will redirect you to the setting page from you can change the setting according to your needs . [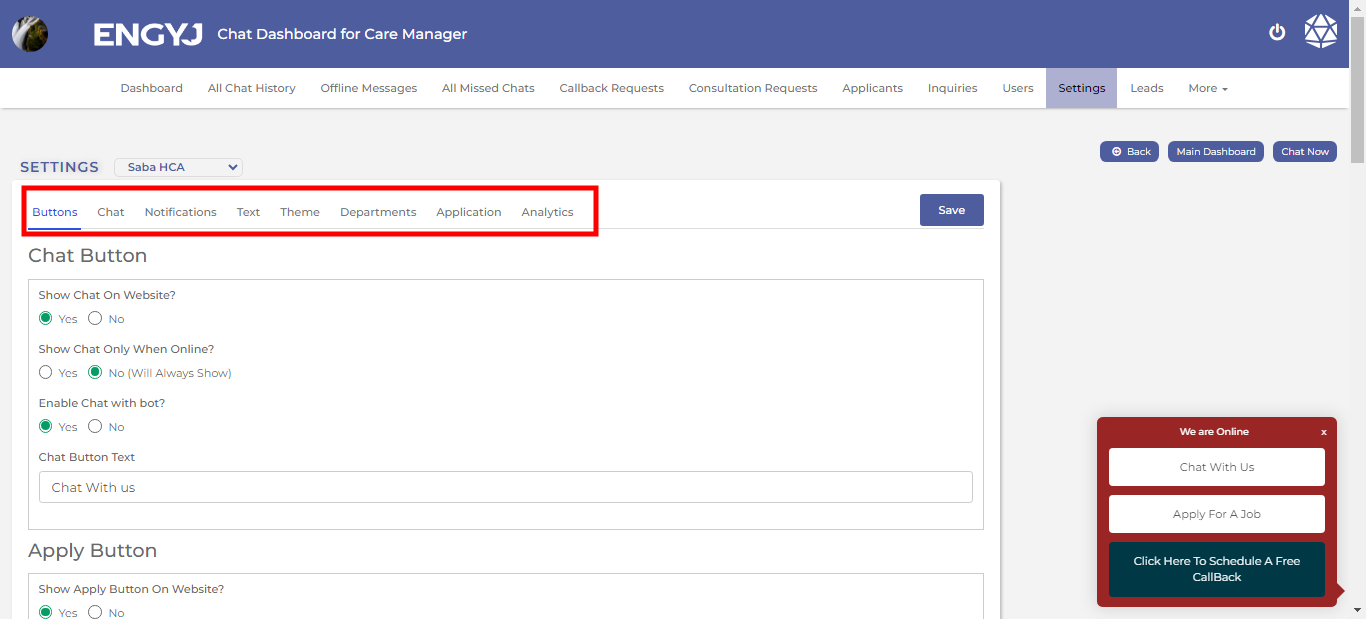](https://documentation.engyj.com/uploads/images/gallery/2023-12/setting-options.png) You can make changes by selecting the desired option in any column of the settings table. If you want to make changes in buttons, click on the button; For chats, click on chat; For notifications, click on notification. For text, click on text; For theme, click on them. For department. click on department. For application, click on application. For analytics, click on analytics. After changes click on the save button on top right corner of the table. # Chat Widget Code To manage settings, go to **Settings** menu item. From here you can go to your desire site and copy the code of the chat by click on the "</>file icon" [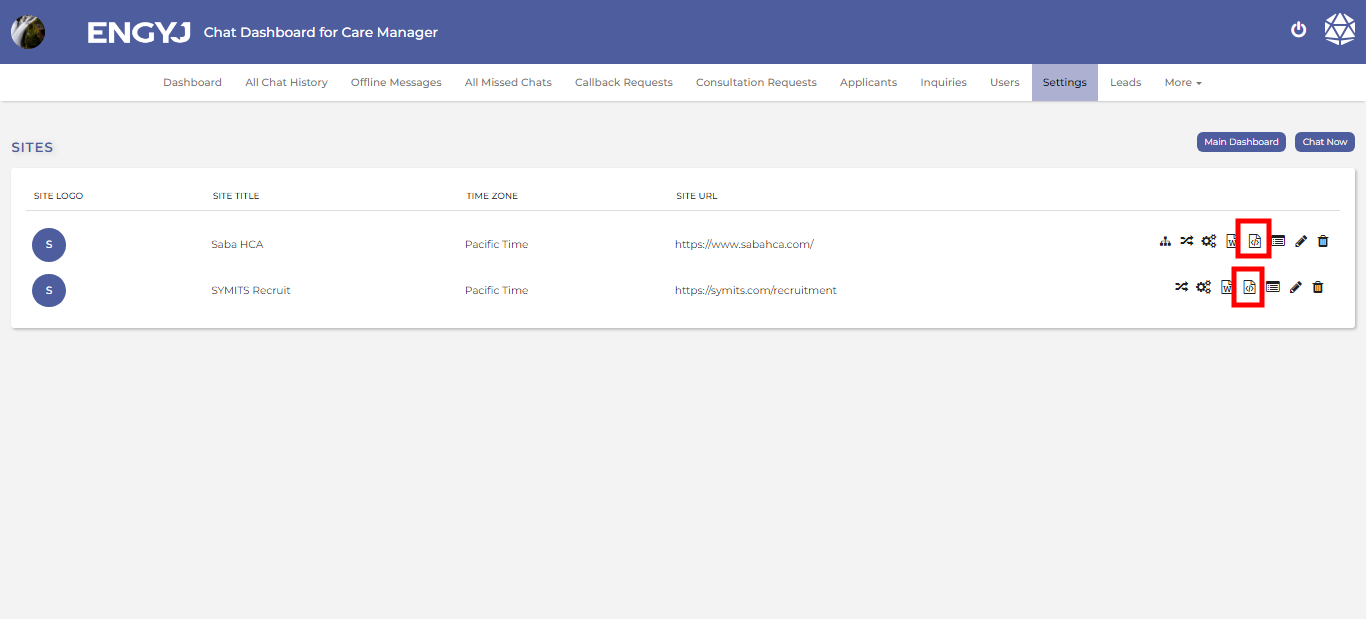](https://documentation.engyj.com/uploads/images/gallery/2023-12/chat-code.png) After clicking, a dialogue box will open where you can copy the provided code. [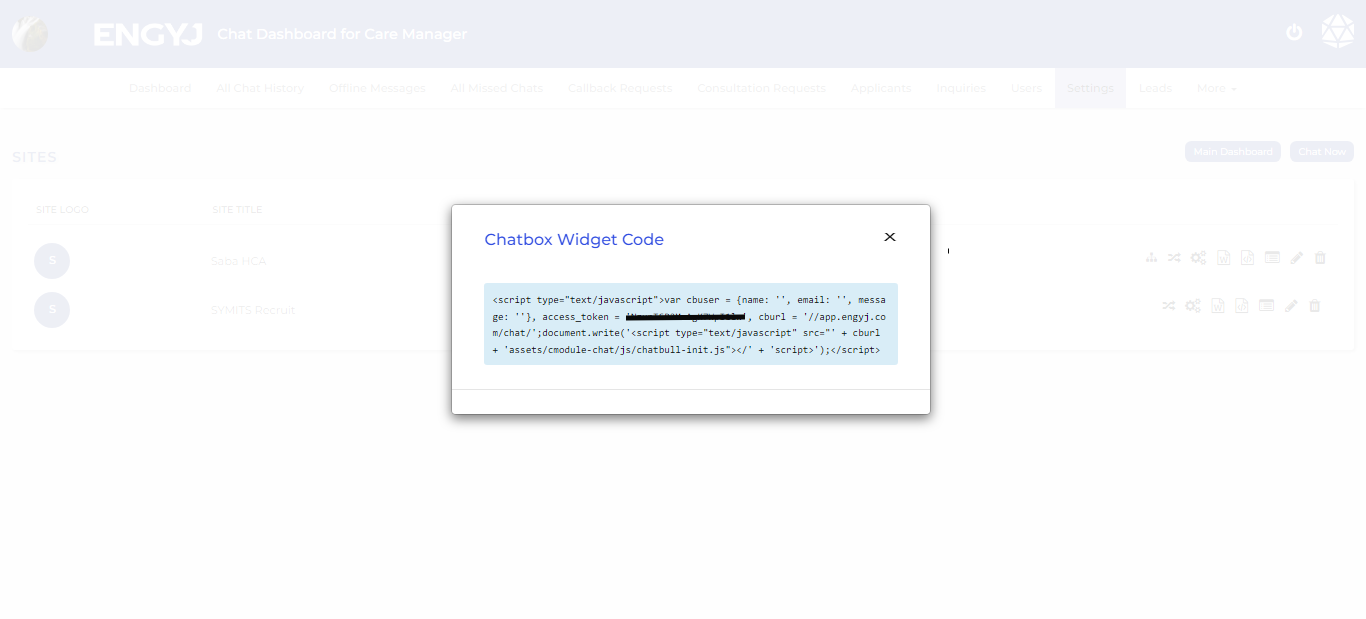](https://documentation.engyj.com/uploads/images/gallery/2023-12/usschat-code.png) # Canned Messages # Canned Messages: Canned messages is a cool feature for agents to reply faster the visitors during the chat. These are cut & dry message templates which could be selected with a single click and send across. To manage, go to **More > Canned Messages** menu item. Here all the created canned message will appear along with the name of the creator of that canned message under the NAME column Each canned message can be deleted by clicking the DELETE icon under ACTION column. Canned messages can be MODIFY by click on it. Check the following figure for reference. [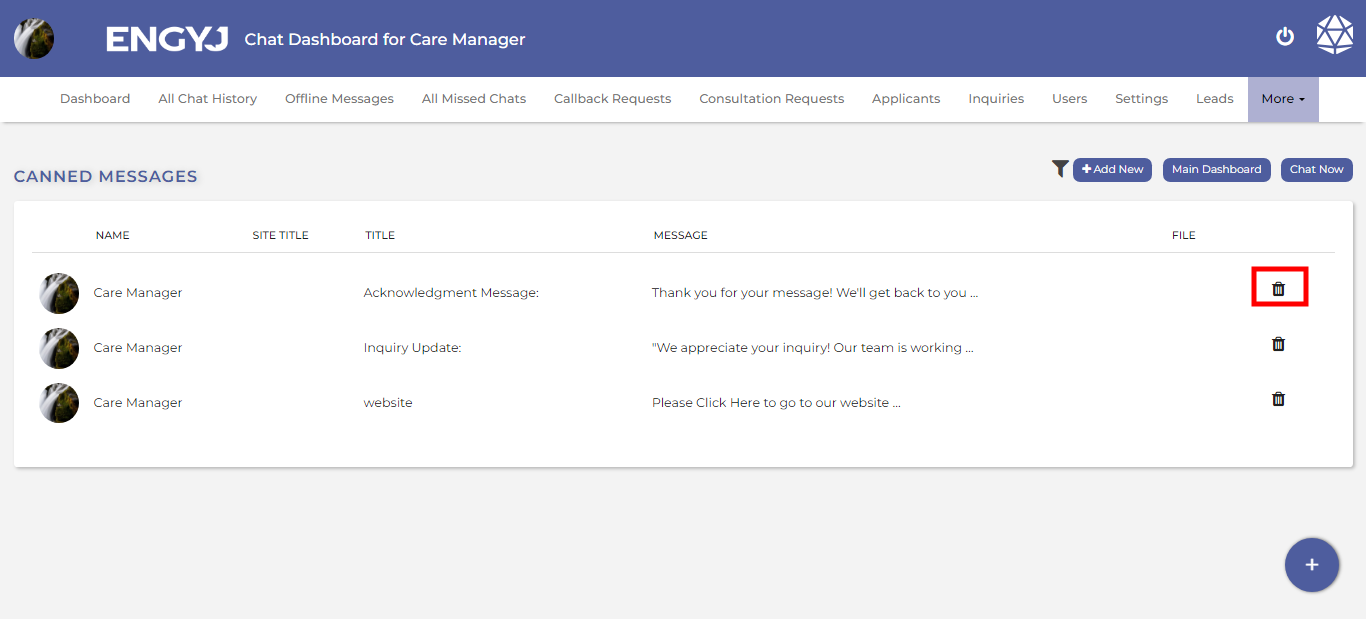](https://documentation.engyj.com/uploads/images/gallery/2023-12/X0edelete-canned-message.png) You can also edit canned messages; you just need to click on them. # Add New Canned Message: To manage, go to **More > Canned Messages** menu item. 1. Clicking the bottom right corner + button will open a popup where user can fill the title of the Canned Message and the text which will be sent in the chat upon selection. 2. You can also add canned message by clicking on the top right corner beside "chat now and main dashboard" button. Check the following figure for reference. [](https://documentation.engyj.com/uploads/images/gallery/2023-12/mQhadd-canned-message.png) NOTE: Both title and message fields are used during the quick search while sending a canned message in chat panel. # Departments # Departments To manage departments, go to **More >** **Departments** menu item. Here you can see a record of all the created departments with their status. [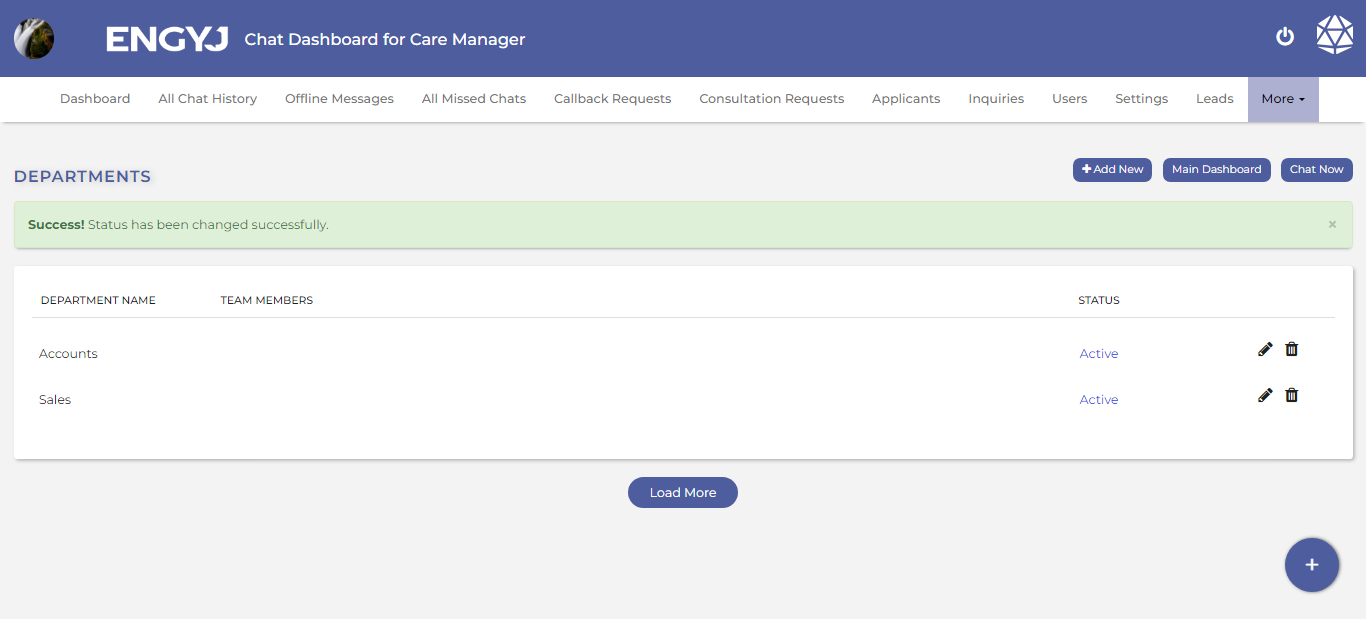](https://documentation.engyj.com/uploads/images/gallery/2023-12/UVWdepartments.png) # Create a New Department To manage departments, go to **More >** **Departments** menu item. To create a new department there are two option 1. click the **+** button given in bottom right corner of the screen as shown in following figure. 2. Click on the add button on the top right corner beside "chat Now and Main dashboard" button [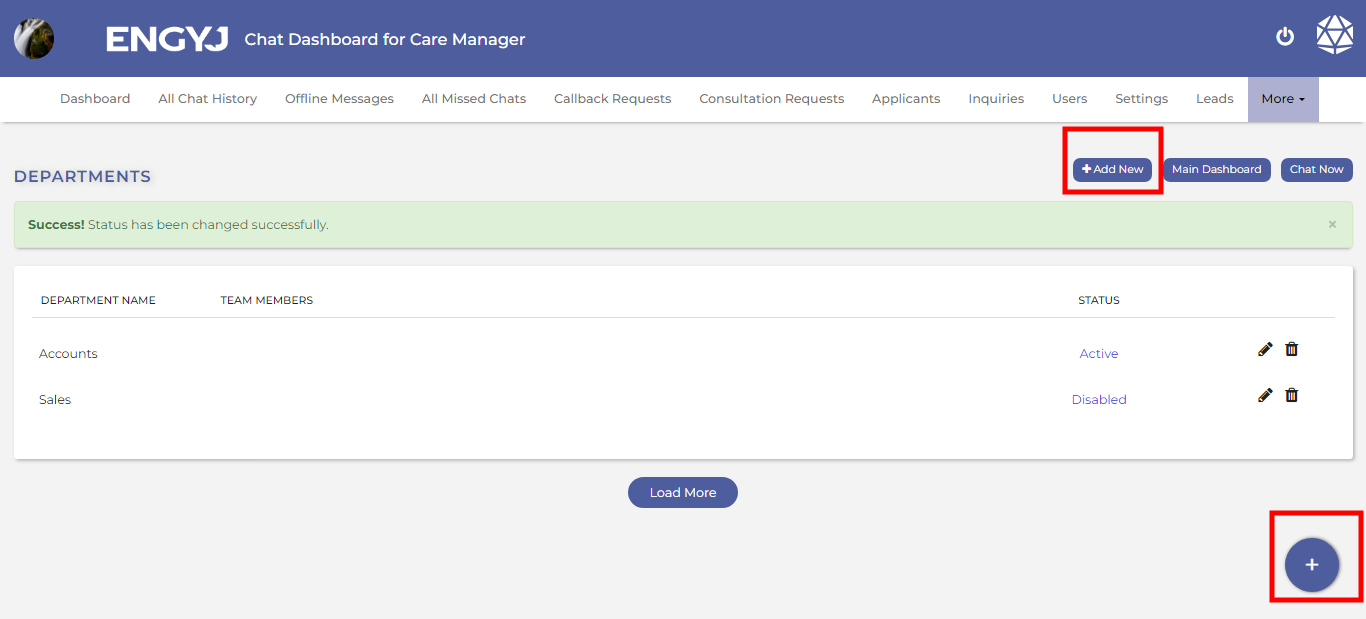](https://documentation.engyj.com/uploads/images/gallery/2023-12/3lwdepartments-add.png) This will open a dialogue box where you can enter the department name and hit the SAVE button to create the department. # Change Status To manage departments, go to **More > Departments** menu item. A status of the department could be changed by clicking their current status for the individual row of the department under STATUS column. [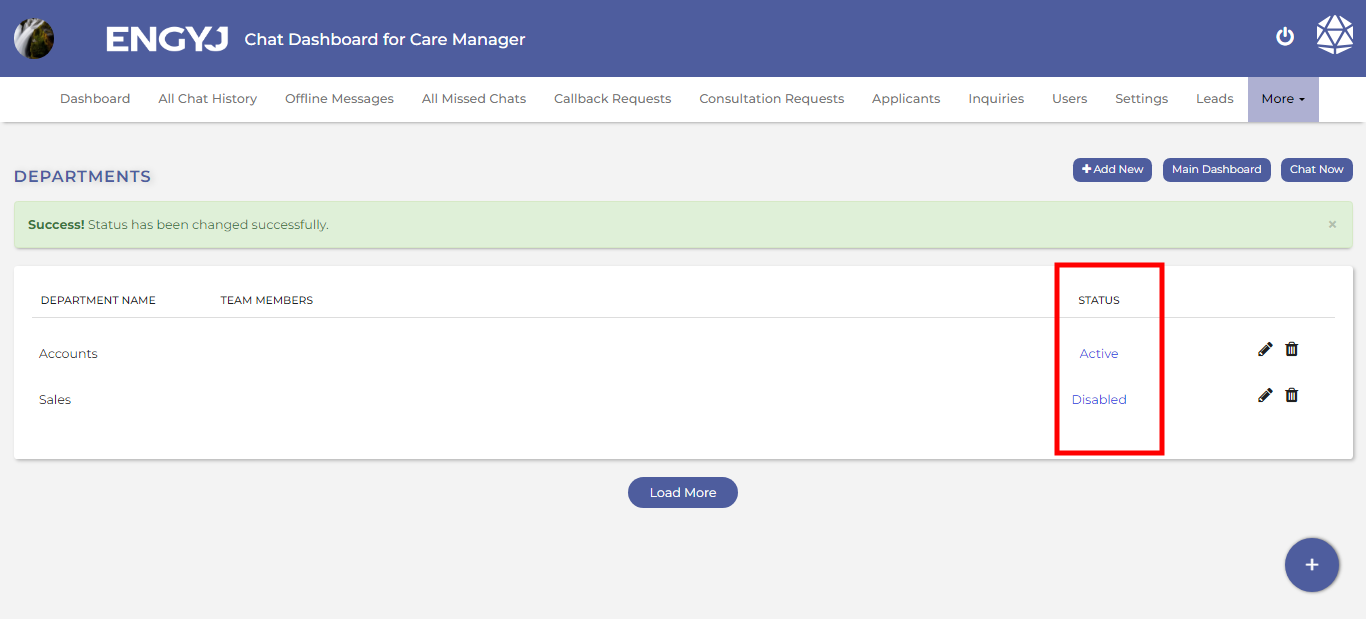](https://documentation.engyj.com/uploads/images/gallery/2023-12/qCudepartments-status.png) If this is Active then it means, the department is currently active and clicking on this will turn it to disabled. If this is Disabled then it means, the department is currently disabled and clicking on this will turn it to active. # Modify a Department To manage departments, go to **Departments** menu item. To modify a department, click the pencil icon under ACTION column of the specific row in the list of the departments. or Just click directly on that department, and you can edit it right away. [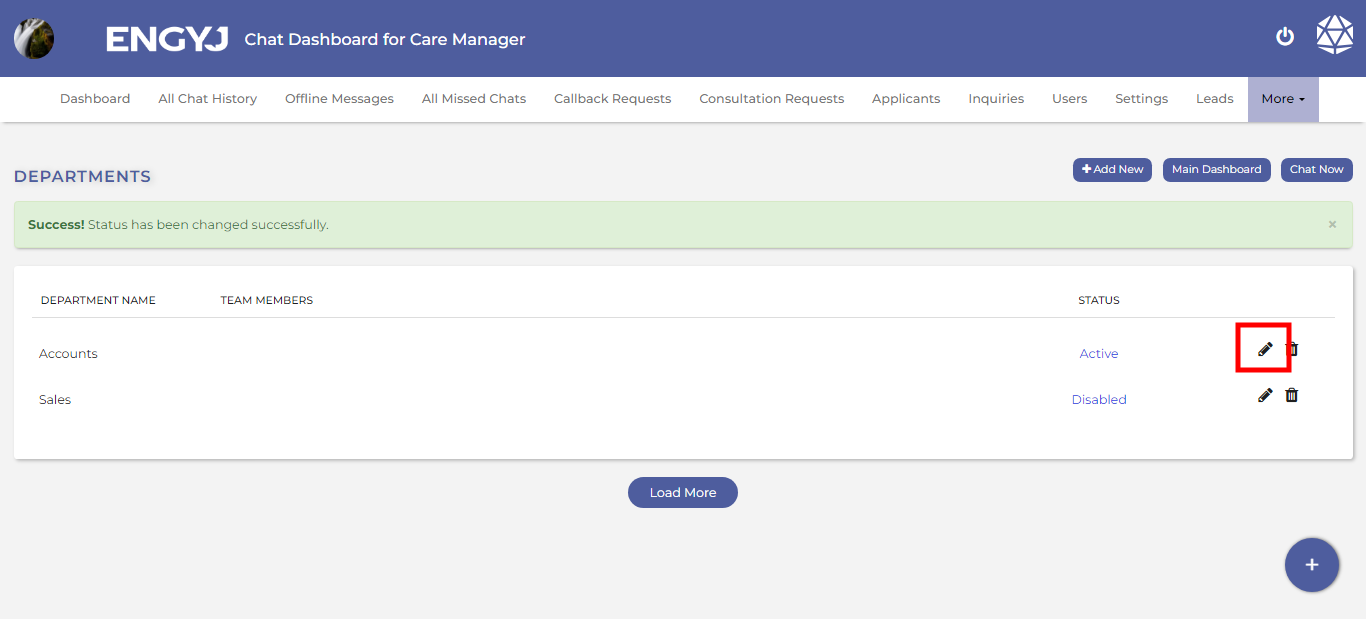](https://documentation.engyj.com/uploads/images/gallery/2023-12/b7kdepartments-modify.png) This will open a dialogue box where you can change the name of the department and save it. # Delete a Department To delete a department, go to **Departments** menu item. Click the delete icon under ACTION column of the specific row in the list of the departments. [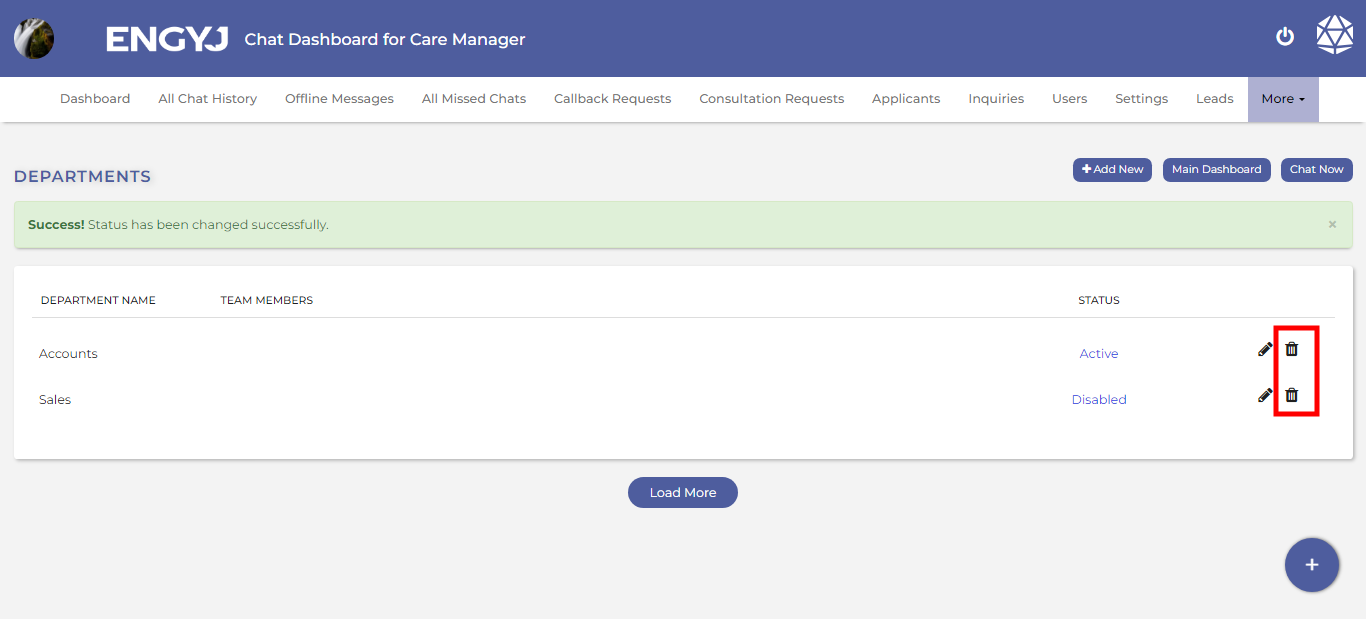](https://documentation.engyj.com/uploads/images/gallery/2023-12/iQzdepartments-delete.png) This will open a confirmation popup box with YES and No options to confirm before deleting a department. If chosen **YES**, then the department will be deleted from list. NOTE: Deleting a department will permanently delete that from database. This cannot be recovered later. So, be careful when you perform this operation. # Mobile app # Chat Invite And Accept Notification When a visitor initiates a chat on the website, the system detects the incoming request. At the same time, if the user is using his mobile app and is currently online, he'll immediately receive a notification alerting him to a new chat request. [](https://documentation.engyj.com/uploads/images/gallery/2023-12/chat-invite-border.png) When a visitor sends a chat, the user will receive the option to either accept or decline it on the "Visitors" screen on the user's side.. [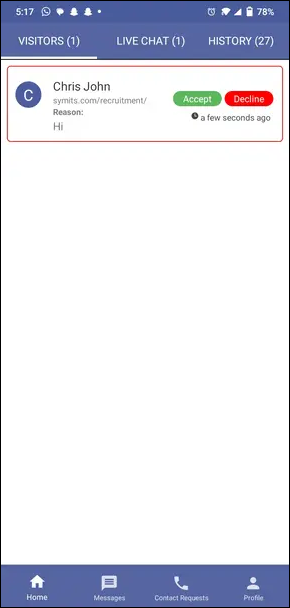](https://documentation.engyj.com/uploads/images/gallery/2023-12/sVSchat-accept-reject.png) If the user accepts the chat, the visitor will receive a message indicating that the user has joined the chat. From there, they can communicate with each other. # Ongoing Chat Visitor and user can start a chat session within this interface. Upon the user's acceptance, a dedicated chat window promptly opens for both parties. Visitors and users can easily exchange chat messages. Visitors or users can send attachments to each other by clicking on the attachment icon. The user can view the visitor's personal information by clicking on their name. Users can efficiently forward relevant conversations to others using the chat forwarding feature by clicking on the three dots icon. Users and visitor can choose to end the chat whenever they want, making the engagement experience user-friendly and flexible. 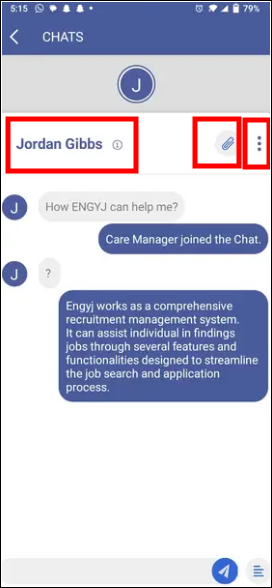 # Chat History When a chat session ends, whether initiated by the visitor or the user, the entire conversation history is automatically saved. The preserved conversation is easily accessible within the "History" screen on the user's side. This feature makes it easier for the user to manage and oversee things. It provides detailed information about the visitor and allows the user to make any needed changes. [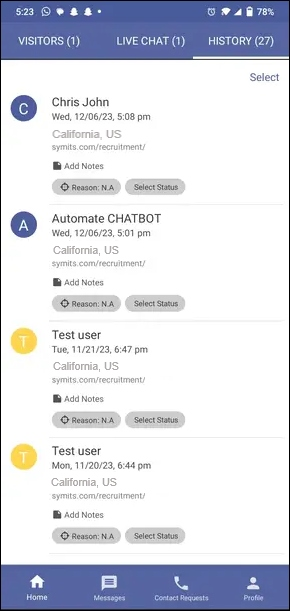](https://documentation.engyj.com/uploads/images/gallery/2023-12/chat-history-border.png) # Missed Chats This section shows missed messages, making it easy to find and respond to them. If the user misses incoming messages, there's a special "Missed Chats" section integrated into the user panel. [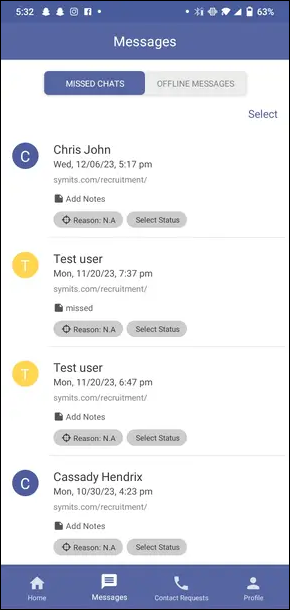](https://documentation.engyj.com/uploads/images/gallery/2023-12/missed-chat-border.png) # Offline Messages When the user is not available, a specific feature becomes active. If a visitor starts a chat when the user is offline, their messages will be automatically redirected to the **offline messages** section on the user's side. [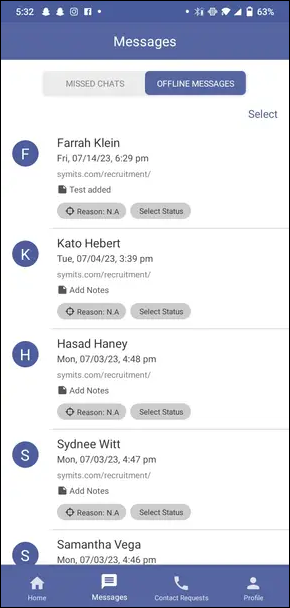](https://documentation.engyj.com/uploads/images/gallery/2023-12/offline-message-order.png) # Call Requests Users can see all the **Callback Requests** from the APP by Navigation to the Call Requests menu on the bottom. [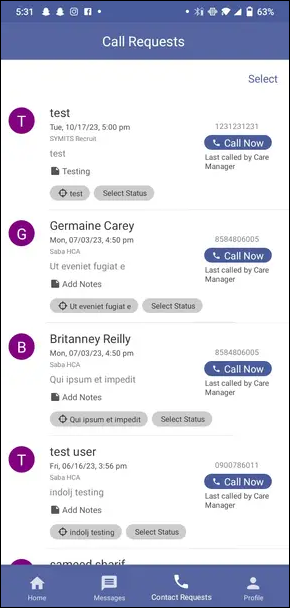](https://documentation.engyj.com/uploads/images/gallery/2023-12/callback-request-border.png) # Admin Settings Users can easily customize how they appear online using a user-friendly Mobile APP. The APP allows users to set schedules for when they are available, giving them flexibility in managing their online presence for optimal accessibility. The APP provides the option to turn notifications on or off when every new visitor comes to the website. With these extensive controls, users can easily handle their online presence, improving visitor engagement through personalized and fine-tuned interactions. [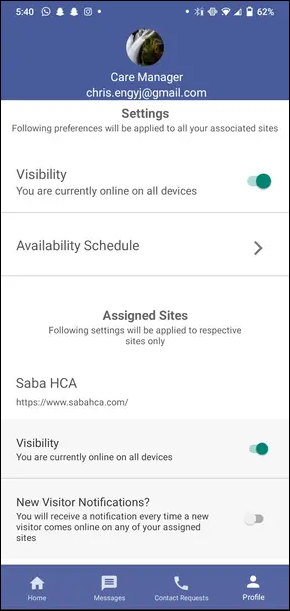](https://documentation.engyj.com/uploads/images/gallery/2023-12/settings-border.png) # Online Schedule Settings We're excited to introduce our robust online scheduling system, where users can customize their availability with precision. Users can easily adjust their availability on different days and time intervals using intuitive and user-friendly schedule settings. [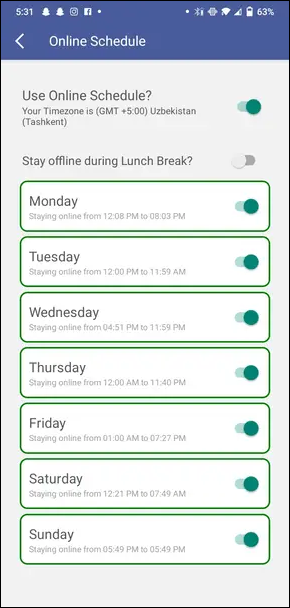](https://documentation.engyj.com/uploads/images/gallery/2023-12/online-settings-border.png)